by Catherine Haug, March 19, 2012
In this article, I discuss the basics of fitting a sloper to a particular body as well as fitting in general. See also previous articles in this series:
- #1: Making Simple Garments
- #2: Garment Creation: Basic Fitting Patterns, The Sloper and Block
- #3: Garment Creation: Supplies
- #4: Garment Creation: Common Fitting Issues (under construction)
This discussion will include:
- Fabric grain
- Effective use of darts
- Preparing the sloper muslin for fitting
- Fitting order (general)
- Fitting adjustments (general)
Fitting features
Getting a proper fit depends on two basic concepts which are discussed in more detail below. See Fitting Features: Fabric Grain and Use of Darts (printable pdf) for more detail on the following topics:
Fabric Grain
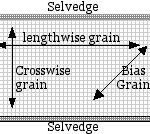
- Types of grain (lengthwise, crosswise and bias grain for woven fabrics; lengthwise and crosswise direction for knit fabrics;
- Fabric drape: different effects, depending on the direction of grain. For example, a garment cut on bias will tend to cling to the body’s curves, but some fabric types do this better than others.
- Effective use of grain: If garment is cut on vertical grain, keep vertical grain plumb to vertical, and horizontal grain parallel to the floor, when wearing garment, to optimize the fit and drape of any garment. If garment is cut on horizontal grain, keep horizontal grain plumb to vertical, and vertical grain parallel to the floor.
Darts
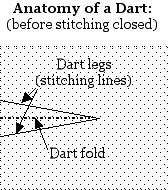
- Anatomy of a dart (sketch, right)
- How darts work to shape the garment over the body’s angles, curves and protrusions;
- Using darts to improve fit.
Fitting your Muslin
The best place to start fitting is with a sloper muslin, because it is close-fitting, and mimics your body closely. But this same method can be used for any garment or muslin.
Preparing your muslin for fitting
See Prepare your garment or muslin for fitting (printable pdf) for more detail on the following topics:
- Add reference lines, matching points and apex marks to pattern.
- Add seam allowances – distance between the seam line and cutting line for strengthening the seam, but also useful if you need to adjust the position of the seam.
- Cut out of fabric; I highly recommend doing a preliminary fitting on muslin before cutting out of your nice fabric.
- Transfer all markings to muslin/fabric (reference lines, matching point and apex marks).
- Baste garment/muslin together, preferably by hand (it’s easier to rip out if needed).
Fitting Order
Palmer and Pletsch in their book Fit for Real People, recommend fitting from the top, down; and from the back, to the front. They do their initial fitting on a paper pattern, but if you are doing a sloper, it’s easier and more accurate to fit with the muslin.
Here is their recommended order for all garments or muslins; if you go by a different order, you may end up with the same result, or not, but it will take longer to get there.
Bodice:
- Fit the back length, starting at the top and working downward. Use the levelness of shoulder-blade line and underarm/bust/midriff lines as a guide;
- Fit the back width, starting at the shoulders and working downward;
- Fit the neck and chest;
- Fit the front, including the bust; adjusting length before width. Use the levelness of chest, underarm/bust/midriff lines, and bust apex as a guide.
- Fit the shoulders;
- Fit the sleeve, adjusting first for cap height and bicep width;
- Fit the sleeve for arm length including elbow position;
- Fit the sleeve for forward shoulder, if applicable.
For a skirt:
- Use the levelness of your buttocks level (at the apex of your buttocks) as a guide. If you are widest below the buttocks level (have extra flesh on the sides, at the top of the thigh), use that wide-thigh level as a guide for levelness as well.
- Start at buttocks on back, abdomen on front, then work downward, making width adjustments at SS. [I recommend fitting the waist last.]
- Tug skirt up/down at waist/hem to ensure the buttocks level is level all around.
- When buttocks/wide-thigh levels are level, then adjust darts at waist.
For the most part, I follow this order except I adjust the shoulder while adjusting back length and neck/chest, because for me, these changes overlap.
Fitting adjustments
As you analyze the fit of your garment, you look for:
- pull-lines (points of tension), wrinkles (horizontal or vertical), darts wanting to form (or gaping), or extra fabric in places.
- basted reference lines being off-plumb (vertical lines) or off-level (horizontal lines).
Then adjust darts or seamlines a little at a time until the fit is just right. I usually modify a seam line by 1/8″ – 1/4″ at a time, and dart stitching line by 1/16″ – 1/8″ at a time until the fit is right. Sometimes you need to adjust two different seams/darts at the same time to fix a problem.
Make adjustments by moving stitching lines within the seam allowance or garment area as much as possible. However, sometimes you have to slash through the muslin’s garment area to lengthen or widen, then baste in a scrap of muslin to fill the gap (don’t do this with your fine fabric – that’s one of the reason I recommend fitting a muslin first).
Sometimes you create new darts where the fabric wants to make a dart (it folds into a dart shape), then pivot to move the dart to a more desirable location. A classic example of this is a bodice that folds or bunches up near the underarm, pointing toward the bust apex. This happens when the breast is larger than the garment was designed to accommodate. The fix is to mark the dart where it wants to form, then pivot it to a new sideseam, shoulder or neck dart, or to enlarge an existing one.
The fitting process is tedious, and for this reason, I like to resolve all my fitting issues on the sloper first. Then when you fit your blocks or designed patterns made from the fitted sloper, they will need very little adjustments.
And remember, as you make adjustments:
- the center back/center front must remain on grain (plumb to vertical);
- the horizontal reference lines (chest line, shoulder-blade line, underarm/bust/midriff line, hip line) must remain parallel to the floor; and
- the shoulder line on a sleeve must go down the middle of the outer part of your arm when it hangs naturally at your side, ending at the middle of the top of your wrist.
NOTE: for some styles, a properly designed horizontal reference line may not follow the grain across it’s entire width, but all points must still be equidistant from the floor when the garment is worn. For example, an A-line skirt:
References
Cat’s articles
- Making Simple Garments
- Garment Creation: Basic Fitting Patterns, The Sloper and Block
- see Garment Creation files (on Home, Farm, Ranch Files page) for index
Printable pdf files:
- Cat’s Bodice & Sleeve Sloper
- Cat’s Shirt Block
- Drafting a Sleeve Block
- Prepare your garment or muslin for fitting
- Fitting Features: Fabric Grain and Use of Darts
- How Darts Work
Other sources
Threads Magazine:
- Grainline
- Hit Your Mark with Darts
- Moving flare in a skirt (Example of being off-grain)
- A Fix for a Baggy Seat (Example of Kenneth King’s fisheye dart)
Others
- Fit for Real People by Pati Palmer & Marta Alto, published 1998 by Palmer/Pletsch Inc., Portland OR
- Fitting Coats and Suits 1963, by Margaret Smith; Home and Garden Bulletin 11, USDA


